Watercolor Landscape

This watercolor starts with light pencil drawing of the lines of ground, mountains, and sky.  The pencil lines are guidelines for the watercolor layers.  Students must paint each layer of the painting without the colors mixing.  They must leave a thin, white space of paper between colors.

We usually talk about abstract art. We discuss that abstract paintings can look like different things to every person.  I ask questions to try to open their minds to some appreciation of abstract art.

Hex Signs


We lived in Boyertown, PA for 7 years, and we saw plenty of hex signs on barns everyday.  There are more towards Kutztown and surrounding rural areas.  Hex signs are only found in this area of PA and are a tradition of the Pennsylvania Dutch (not the Amish).  We usually start the lesson with examples of hex signs, mostly from things I have collected from the annual Kutztown Festival.  We use a ruler and compass to help the design to be symmetrical. I print out the other elements that are used in Hez sign designs and their meanings: diselfink, rosette, scallop, star, oak leaf, tulip, heart, pentagram. This is usually the first time artists have used a compass in art, so I give them plenty of practice paper to make circles. We use stiff bristol for the finished work.  Hex signs are very colorful, so we use colored pencil or crayon, and paint will work great.

Underwater Watercolor


Do the Gelly Roll

I love this project!  This project is a large size 'doodle' on black paper using metallic 'Gelly-Roll' markers (available at scrapbooking stores and Michaels).  High quality black paper works the best with the roll markers.  Black construction paper is too textured and is not acid free. I usually give an assignment as an ideas starter, for example, a pet or flower to start.  The students are to 'doodle' in the background of the initial drawing, using repeating patterns and connecting objects.  These markers have to be held at a 90 angle, and can be tricky for beginners.

Smelly Marker Still Life

New students love this project. I always make them laugh introducing the markers.  Students don't believe how they smell!  These markers are great for impaired art students.  They can smell the black licorice before they draw with it.
 I have them draw all kinds of fruit with pencil first on a seperate sheet of paper.  We color the fruit with the scented markers, exploring each scent as we color.  I have a collection of wallpaper sample books that we use to cut out the vase shape.  The fruit and vase gets glued onto stiff paper. I usually draw the background wall design and table after everyting is glued.

One Dot at a Time

In my bead classes, I often say to new students, "you have to string one bead at a time".  In this art class, I always repeat, "one dot at a time" as a mantra for my young students.  They have a tendency to rush, making each dot a stripey, sloppy line.  This is a great project for intermediate students with the ability to work for 3 or more hours on one project.  The placement of dots can seem calming, like knitting or running.

I was introduced to pointalism in my high school art class, and continue to use the technique within drawing textures with pencil and adding depth to watercolor.  Using pencil to sketch the idea very lightly, we layer fine-tipped marker dots, gradually blending colors. I remind the students that you cannot erase mistakes.  This is an additative process.  Make darker lines by placing the dots close together. I usually work small;10X10.

Rolling Landscapes

I don't tell the students what we are drawing when I give them the directions for this artwork: Hold your paper portrait and make 7 wavy lines, letting your natural top-to-bottom hand motion create the rolling hills.  Turn your paper landscape and draw 3 mountains.  Add 5 trees (no lollipop trees), 3 patchwork fields, 1 barn, 3 animals, and 1 fence. (barn, trees, and animals must be smaller than mountains)
I often let the students do anything else extra creative as long as their drawings have the few required items.  These suggestions help younger students be creative and help them to fill the page. We finish with marker outlines and colored pencil.

Hand Drawings


This hand drawing project I use as a first project and to get to know new students. Hands are very personal and this is an easy talk-while-you-work project. I either trace students hands with a pencil, or have them do their own.   Students are to use pencil to cover the inside of the palm and fingers with a repeated design or many repeated designs.  We discuss repeating patterns and designs and look for them in clothing, wallpaper, and in the classroom.  I usually give ideas to students and this pattern sheet is great for inspiration.  Final work can be colored pencil or marker. I usually date the back of the works because the hand tracing can be a momento.


This very talented student loves to draw from life, especially Littlest Pet Shop toys. His favorite color is red. He wants to draw a black panther during next class.

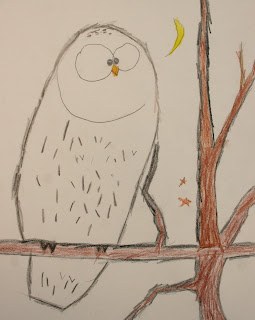
Owl Drawings

Owl Drawings


This owl drawing begins with color photos of real owls as research and inspiration.  I often encourage the combining of elements from two different photos for individual drawings.  For example, the branches of one photo and the owl of another photo.  Start by drawing branches for for the owl to perch, one in foreground, one in background.  By drawing the owl lightly with pencil, make sure that the tail is 1/3 or 1/4 the length of the owl itself, and the tail hangs down below the branch it is sitting on.  Discuss symmetrical eyes and talons. I use this as a chance to work on drawing branches, suggesting thick to thin lines, long and short lines. Finish by layering colored pencil.