

Showing posts with label pencil. Show all posts
Showing posts with label pencil. Show all posts
Winner!


Still Life Drawings

This is a traditional still life drawing, but I teach it with a twist. I start out with only one piece of fruit, let the students draw it, then I add another. This simplifies the arrangement and lets them focus on one object. I ask lots of questions about the objects so the students will begin to look harder and make connections between objects. "Do you see the triangle of space between the birds nest and the banana?" "Is the candle one apple wide?"
To start drawing, we simplify each element. For example, the candle becomes a simple cylinder, the apples become circles. Only when every element is in the correct place and is the correct size do we add the details. (the pinecone is really that large)
This is a strenuous exersize and is usually the only time these young students have done a dry still life. They are always amazed with their results.
Winter Cardinals


The bottom artist a 3rd grader; the top artist is in Kindergarten, so this lesson is great for all ages and talents.
This project is great for the winter! I give the students a funny shaped template that is just the outline of the bird. Most students don't know what the shape is. I have them draw the side wing, tail, and legs. The branch is added with pencil and the berries and leaves were the students ideas. The sky and bird can be colored with colored pencil or crayon, making sure to press hard when coloring the branch. I usually give students inspiration in the form of printed images of cardinals and branches.
One Dot at a Time


I was introduced to pointalism in my high school art class, and continue to use the technique within drawing textures with pencil and adding depth to watercolor. Using pencil to sketch the idea very lightly, we layer fine-tipped marker dots, gradually blending colors. I remind the students that you cannot erase mistakes. This is an additative process. Make darker lines by placing the dots close together. I usually work small;10X10.
Rolling Landscapes

I don't tell the students what we are drawing when I give them the directions for this artwork: Hold your paper portrait and make 7 wavy lines, letting your natural top-to-bottom hand motion create the rolling hills. Turn your paper landscape and draw 3 mountains. Add 5 trees (no lollipop trees), 3 patchwork fields, 1 barn, 3 animals, and 1 fence. (barn, trees, and animals must be smaller than mountains)
I often let the students do anything else extra creative as long as their drawings have the few required items. These suggestions help younger students be creative and help them to fill the page. We finish with marker outlines and colored pencil.
Owl Drawings
Owl Drawings
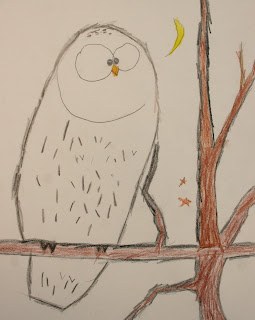


This owl drawing begins with color photos of real owls as research and inspiration. I often encourage the combining of elements from two different photos for individual drawings. For example, the branches of one photo and the owl of another photo. Start by drawing branches for for the owl to perch, one in foreground, one in background. By drawing the owl lightly with pencil, make sure that the tail is 1/3 or 1/4 the length of the owl itself, and the tail hangs down below the branch it is sitting on. Discuss symmetrical eyes and talons. I use this as a chance to work on drawing branches, suggesting thick to thin lines, long and short lines. Finish by layering colored pencil.


Subscribe to:
Posts (Atom)